Daily Guides for Shop Teams
The shape of a shop day, in order, with a pointer to the fuller guide for each part.
Last updated 18 days ago
Introduction
A shop week starts with a plan, and each day has a shape: people arrive, somebody works out who is on what, the work moves, and progress gets recorded so tomorrow can be planned. This is that week and day in order, with a pointer to the fuller guide for each part.
Video walkthrough (1 min 26 sec): check attendance, assign work, record partial progress, leave a next-shift note, and check out.
If you are new and only read one page first, read this one.
Your Day, In Order
1. Plan the Week
If your shop plans in Build Plan, the foreman lays out the week before it starts: which orders go to which location, on which days, and who crews each location. The board checks the plan against the crew's hours, and saving it gives each person their first task when they check in. On the day, use Build to review the agreed work and assignments. See Daily Team Planning.
2. People Check In
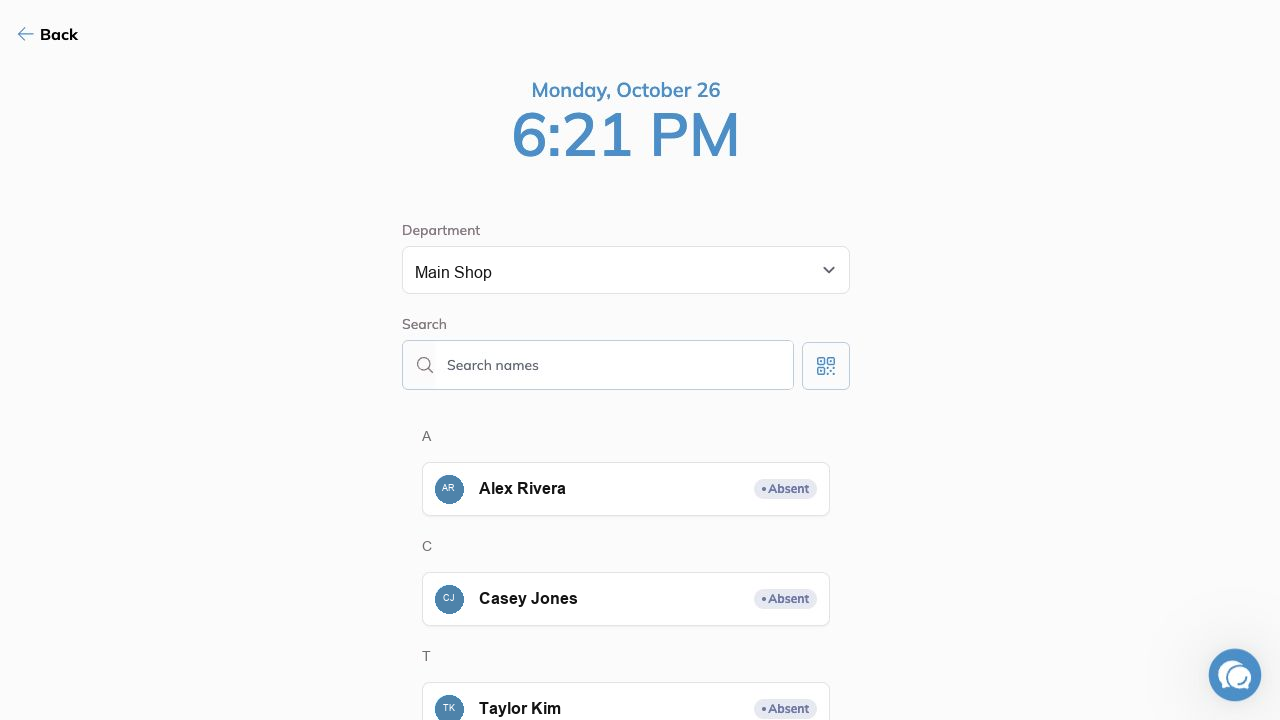
Attendance is how Building Swell knows who is actually here. Click Attendance in the Build toolbar to see who is checked in and who is absent. On a phone or tablet, tap Controls and pick Attendance.
Check attendance before starting work. You can prepare assignments for someone who has not arrived yet. When you finish assigning in Build, review the check-in prompt and confirm only the people who are actually present. See Attendance.
3. Open Build
Build is the shop floor screen: every active order, the stages on it, and who is working each one. Click the hard hat icon at the bottom left, or tap the Build circle in the bottom bar on a phone or tablet. See Build.
Use the View toggle to switch between the two layouts:
List view shows each order as a collapsible row with its stages underneath.
Grid view shows each order as a card with its stages and assigned workers visible at a glance. This is the view to use when you are balancing a whole crew.
4. Assign the Crew
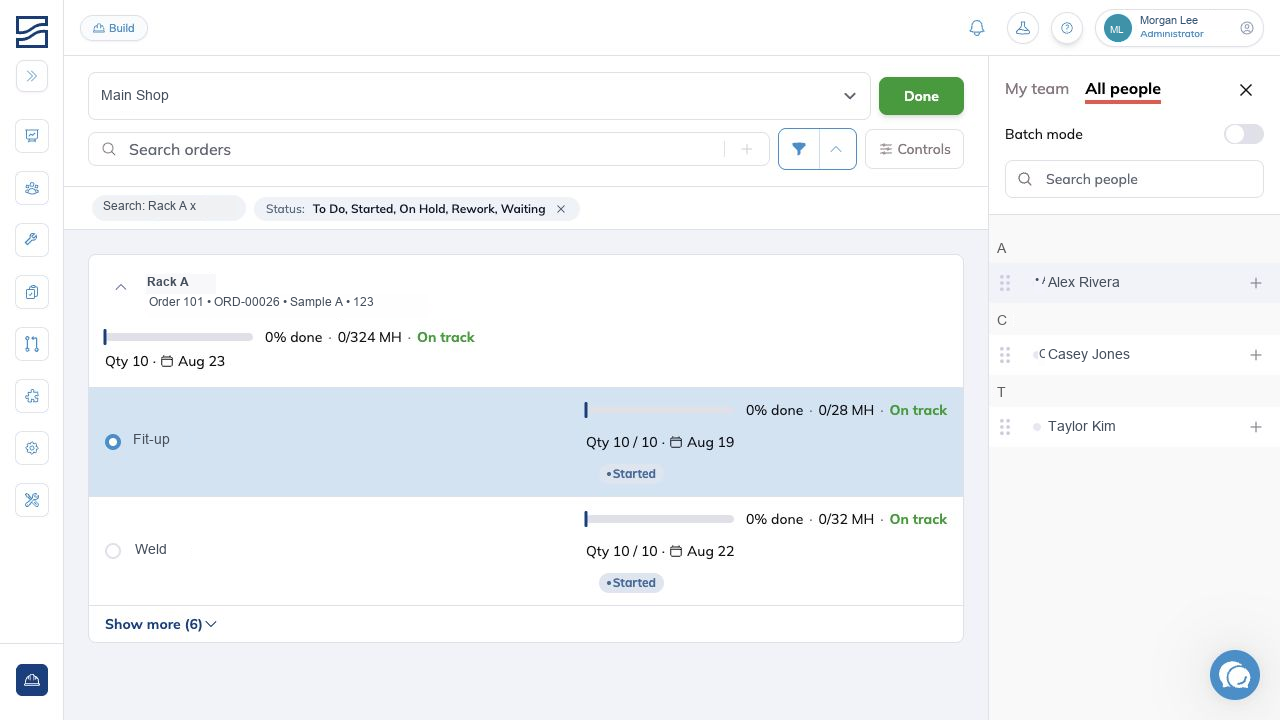
Put people on stages. Anyone marked out of office carries a clock beside their name, so you find out before you assign them. There are three ways to do it.
The Assign panel
Click Assign in the toolbar. A panel slides in showing your team.
People already assigned appear at the top with a remove (×) next to them.
Click (+) next to a name to add them to the selected stage.
Click Done when you are finished.
From an order card
In Build, each order card has an Assign people button. Click it to jump straight into assigning for that order, with its first unfinished stage already selected. This is the fastest route on a phone or tablet. See Assigning People on Mobile.
Batch mode, for several stages at once
Click Assign, then turn on Batch mode.
Check the stages and overhead you want to include.
Select the team members from the right panel.
Click Create batch to apply, or Cancel to back out. It stays greyed out until you have picked at least one stage and at least one person.
While batch mode is on, the Attendance and QR buttons are hidden. They come back when you leave it.
Assigning someone who is absent. If you assign a person who is not checked in, Building Swell asks whether to check them in as part of the same action.
5. Let the Work Run
Time is recorded against the work as people go, which is what makes the timesheets come out right at the end of the week without anybody reconstructing the day from memory. See Tracking Time.
On the floor, scan the work and people codes, review the selected stages and people, then select Start Work. To open information instead, use the details choice after scanning a work code. See Using QR Codes.
6. Update Progress
Open the order and select Completion. For partial work, click the completed quantity beside the step, enter the number finished, and press Enter. Reopen the order to check the saved quantity. Recording part of a step does not complete the whole order.
Progress is the part that pays off tomorrow. A stage marked done moves the order along, and a stage put on hold tells everyone why the work stopped without a phone call. See Stage and Project Progress.
7. Set Up Tomorrow
At shift end, open each person in Attendance and select Check out. Review the saved confirmation.
Bring progress up to date and leave the next shift a specific handoff in the order's Notes. For example: seven units still need mounting, and the first three are ready for Assemble. Reopen Notes to check that the handoff saved.
You can assign people who have not clocked in yet. The assignment waits for them, and they see their work as soon as they check in.
Departments can also do this automatically. Turn on Daily Planner auto-assignment in a department's Settings tab and workers are assigned to planned orders as they check in. See Departments.
Tips
Assign before people arrive, not after. A crew that walks in to work already on their name loses no time at the start of the shift.
Use Grid view to balance a crew. Seeing every card at once makes it obvious where you are thin.
Batch mode is for repeat work. If the same two people cover four stages, batch it rather than assigning eight times.
Update progress as it happens. Catching a whole day up at 4pm is where the errors come from.
Use the QR codes. They exist because typing on a phone in a shop is slow and gets things wrong.
Check the clock icons. They are the difference between a plan and a plan that survives contact with who actually turned up.
FAQ
Do I have to check people in before assigning them?
No. You can prepare work before someone arrives. An absent person’s assignment stays planned until they check in. Build offers a check-in prompt when you finish assigning.
Somebody came in who was marked off. Can I still give them work?
Yes. The clock beside their name is information, not a lock.
How do I put one person on several stages?
Turn on Batch mode in the Assign panel, check the stages, then pick the person. One action covers all of them.
How do I know who is already working?
Assigned people show on the stage in both List and Grid view, and appear at the top of the Assign panel with a remove (×).
Can I reassign someone if plans change?
Yes. Remove them from the stage with the (×) in the Assign panel, then add them to the new one.
Can I plan tomorrow today?
Yes. Assign people who have not clocked in and the work waits for them. For the whole week, use Daily Team Planning.
I am doing this on a tablet and the toolbar looks different.
That is expected. On a small screen the toolbar collapses into a Controls button. See Assigning People on Mobile for the tablet and phone walkthrough.
Conclusion
Review the plan, check attendance, assign the crew, and keep progress current. Before leaving, check tomorrow’s work against the crew and information you have. Use the linked guides for the detailed steps.
Have additional questions? Contact Us
Was this helpful?
Still need help? Ask the team