Import Materials and Parts
Import a material list, review item matches, units and quantities, and check the saved result.
Last updated About 1 hour ago
Introduction
Open the order, route, project or delivery that needs the list. Import your file, check the items, units and quantities against the original, then confirm the import.
Importing a bill of materials defines what the work needs or makes. To record what is physically on the shelf, use the stock-count workflow in Materials and Parts.
Step-by-Step Guide
Before You Start
Have the order, route, project or inbound delivery ready, along with the file you want to import. Check the order's quantity and whether the document lists quantities for one unit or the whole order.
Document-reading options depend on what is enabled for your company. The Assistant supports the matching workflow described below. In the import dialog, automatic document matches and reading shop drawings require the document-reading option to be enabled. If those options are missing, contact support through the in-app chat.
1. Open the Order, Route, Project or Delivery
Open Import from that destination.
You can also attach the file in the Assistant and name the destination. For example: "Import this material list onto order 1234." See BSWL Assistant for attaching files or taking photos.
2. Add the File
For a spreadsheet, use an export from the same kind of destination or its download template as your starting point. Keep the column headings so the importer can read the fields.
For a PDF or photo, use a clear copy with readable quantities and units. With document reading enabled, you can also import tables from shop drawings onto an order or route.
Compare the review with the source. Check that it contains the pages and lines you need, and read any message about a file or page left out.
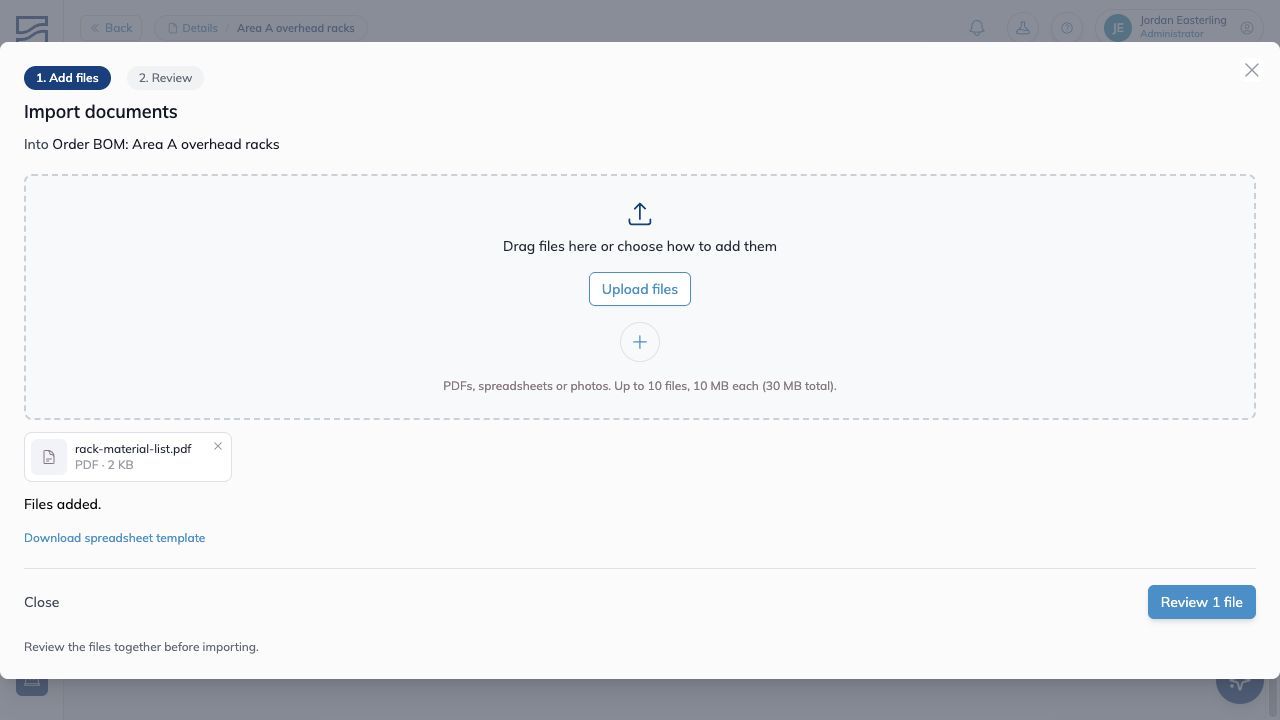
Check the destination above the file list before choosing Review.
3. Check the Items
In a document review, each line shows what the document printed beside the material selected for it.
SKU match means the printed code matched your SKU or, on a delivery, the vendor's part number for that material.
A percentage match is a suggested catalog match. Check its size, grade and finish against the source.
A line with no selected material needs your choice. Search by SKU, description or vendor part number, then select the right item.
When several lines print the same description, your choice for one is offered for the others. Check those lines before accepting the same item.
When the Item Is Not in Your Catalog
On an order or route, a new part or unmatched material can belong to that order or route alone. It stays out of the shared catalog until you choose to share it.
A material carries an NC badge. A local part carries a grey Part badge. These items stay out of reservations, pick lists and purchasing until you match them to a catalog item or share them.
Use Edit on the row to choose an existing item. Use the bookmark on the row when the item should be added to the shared Materials or Parts catalog.
4. Check Units
If a material is taken from inventory, its quantity on the bill of materials must use the unit your inventory counts, such as each, feet or pounds.
If the document uses its configured purchase unit, such as boxes of screws stocked by the each, review the conversion. In a document import, Convert changes the row to the stock unit.
If the source uses another unit, such as feet of angle stocked by the stick, set the stock unit and enter how many you need. Check the lengths yourself before converting a cut list into a number of stock lengths.
Consumables, ship-loose items, tracked-only parts and local items keep the unit used in the file.
Inbound deliveries have a different rule: a line in the material's purchase unit stays in that unit, and receiving converts it to stock. For another unit, the review asks for the stock unit, quantity and cost per stock unit.
5. Check What the Quantities Cover
On an order with more than one unit, a document review asks whether the quantities are For one unit or For the whole order.
Choose For one unit when the document describes one repeated assembly. Building Swell multiplies those quantities by the order quantity. Choose For the whole order when the document already totals everything.
On a route, document quantities are for one unit of an order made from that route.
An exported materials spreadsheet carries a Scaling column: Per unit or Per order. Keep that column when importing the file elsewhere so the quantities retain their meaning.
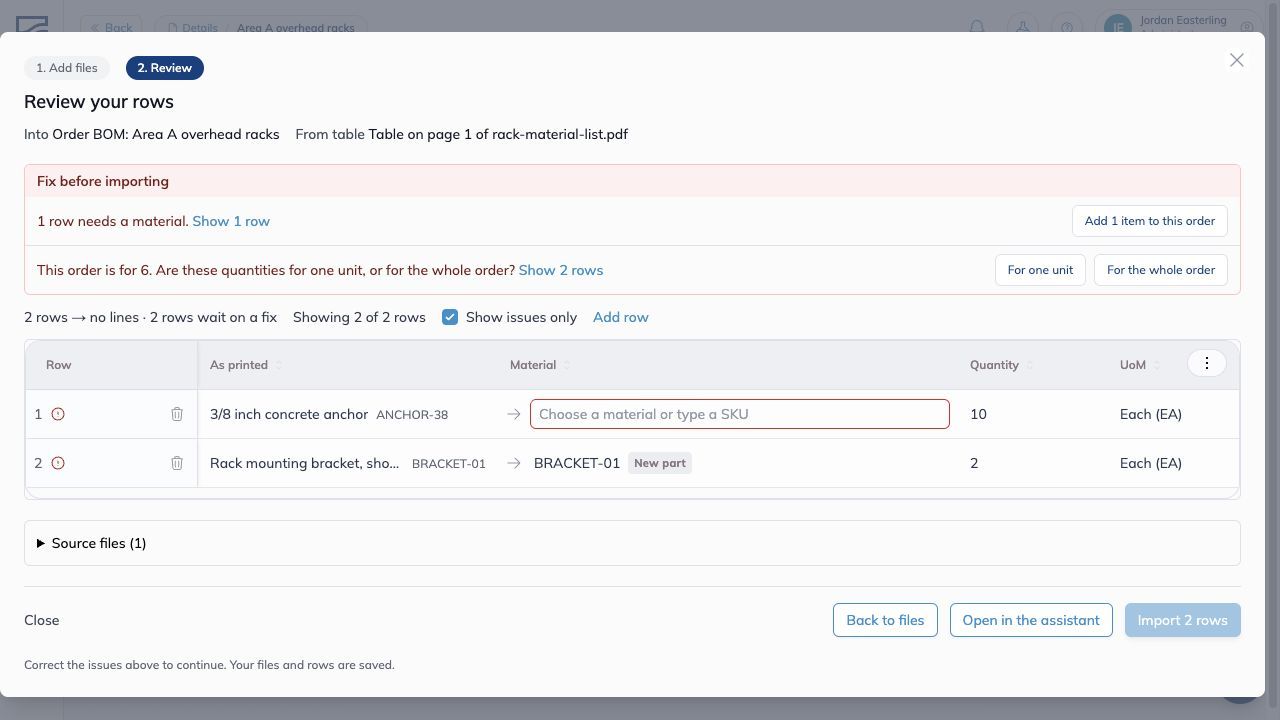
This order is for six racks. Resolve the unmatched material and choose whether the source quantities describe one rack or all six.
Example: Two Assemblies
This is an invented example. The order is for two identical assemblies, and the document lists the requirements for one. Choose For one unit once for this document, then check the totals below.
Before importing, check those totals. If the source already listed everything for both assemblies, choose For the whole order instead.
6. Check Materials, Parts and Stages
Shop drawings can contain both what you buy and what you make. Review the type and flow of each line.
Check which stages use or make each item. If the same beam passes through three stages, mark it Used where it is consumed and Processed where it is only worked on. That keeps the same beam from being deducted from inventory three times.
If lines remain at order level after importing, select them and use Assign stages to place them. See Materials Terminology for the quantities recorded as work happens.
When reading shop drawings, the importer uses piece marks to identify manufactured parts. Check those marks. On a project BOM, parts are left out and the review tells you so.
7. Import and Check the Result
Read the destination, line counts and warnings. Resolve the rows you intend to import before continuing.
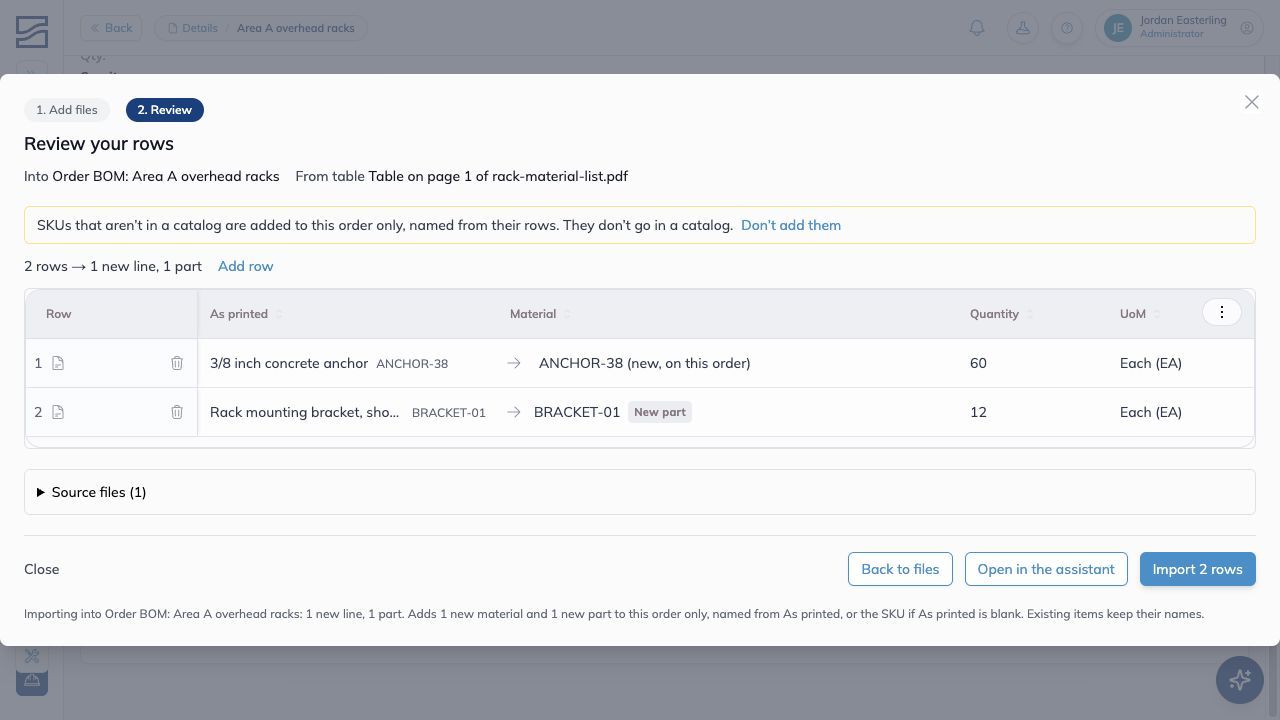
In this six-rack example, choosing For one unit gives totals of 60 anchors and 12 brackets. Both items will belong to this order only.
In the import dialog, confirm the import. In the Assistant, read the import approval card and approve it. Imports still require approval when Auto-approve is on.
After it finishes:
Open the destination's materials or delivery lines.
Compare the saved items, quantities and units with the reviewed list.
On an order or route, check the parts, scaling and stage assignments too.
For the two-assembly example, confirm that the saved plan contains 20 anchors, 200 screws and 4 brackets.
If you close a document import before applying it, reopening Import on the same destination brings back the files and rows you were reviewing. After an import, the next one starts fresh.
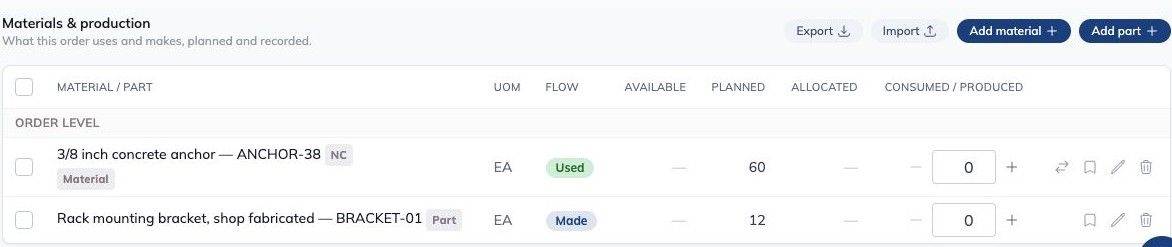
The saved plan for this six-rack order shows 60 anchors and 12 brackets. NC and the grey Part badge identify items kept on this order.
Tips
Compare each selected item with the original file, including its size, grade and finish.
Check the stock unit before accepting a purchase-unit conversion.
Choose whether quantities are for one unit or the whole order once for the document.
Use Used where stock is consumed and Processed where the same item is only worked on.
FAQ
Will an unmatched item be added to the shared catalog?
On an order or route, it can remain local to that work. Match it to an existing item or use the bookmark to share it when other work should use the same catalog item.
Can I use an import to record stock on the shelf?
Use the Materials catalog's stock-count import for that. A BOM import describes the work's requirements. Receiving an inbound delivery records material arriving.
Why are quantities larger than the document?
Check the order quantity and whether you chose For one unit. For a spreadsheet, check Scaling. Quantities per unit grow with the order; quantities per order stay as entered.
Why is a material being drawn more than once?
Check its stage placements and flow. Use Used where stock is consumed and Processed where the same item is counted through another stage.
Conclusion
Check the items, units and quantities before confirming an import. Then open the saved list and compare it with the source, including parts, scaling and stage assignments.
Need a hand with a file? Open the in-app chat or email support@buildingswell.com.
Was this helpful?
Still need help? Ask the team