People
Add the people on your shop floor, record their skills, and import or archive them in bulk.
Last updated 24 days ago
Managing People in Building Swell: A Guide to Adding, Uploading, and Archiving Users
Introduction
People are everyone on your shop floor. Once someone is on the list, you can clock them in and assign them to work. You can add people one at a time, upload a whole list at once, download the list back out, and archive anyone who leaves.

Step-by-Step Guide
Adding Individual Users
- Navigate to Rules Engine > People using the sidebar navigation.
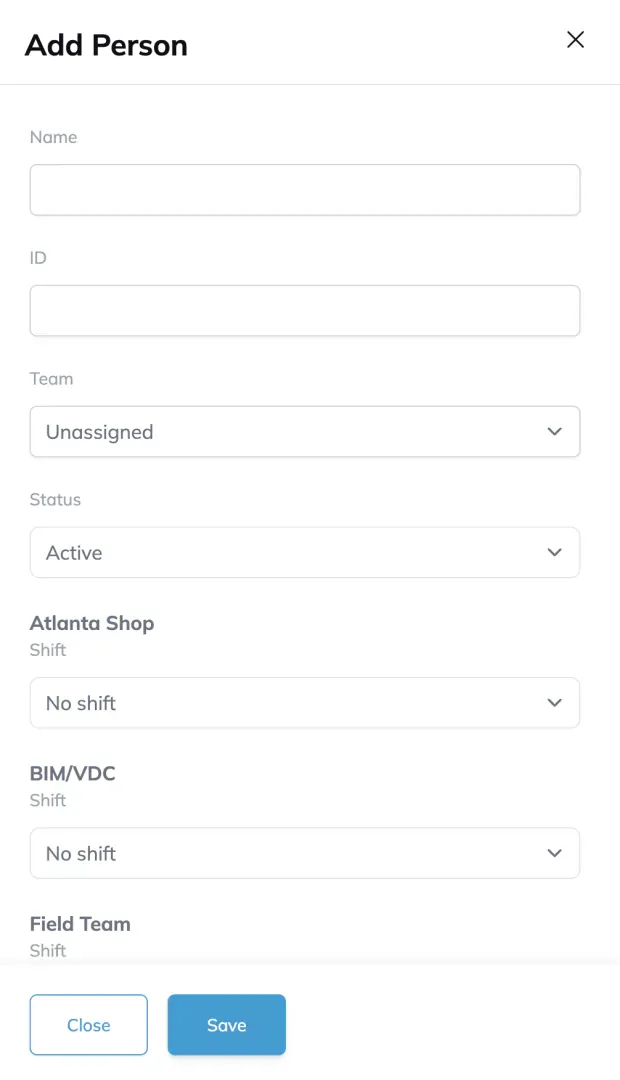
- Click the "+ Add" button in the top right corner. The "Add Person" panel will open on the right side.
- Enter the person's Name and optionally an ID.
- Assign them to a Team using the dropdown (e.g., Assembly, Bending, CNC, Cutting, Equipment, Paint, Ready for Shipping, Welding).
- Assign a Shift for each location (e.g., Atlanta Shop, BIM/VDC, Main Shop, Material). Each has its own shift dropdown.
- Toggle Optional assignment if this member is not required to be assigned to orders.
- Select one or more Skills using the "Search skills" dropdown.
- Click "Save" to add the person.
-
Adding Multiple People
- Click the dropdown chevron (▾) next to the "+ Add" button.
- Choose "+ Add multiple people" to add several people at once through the form interface.
-

Uploading People (Import)
- Click the dropdown chevron (▾) next to the "+ Add" button.
- Choose "Upload people" to import users from a file.
- Match the columns in your upload file to the fields in Building Swell (e.g., skills should match the role).
- Green check marks indicate a successful match.
- Click "Continue" to view a list of people being uploaded.
- Yellow highlighted entries indicate existing users which will be updated.
- Red highlighted entries indicate missing values; these must be corrected before uploading.
Managing Skills
- In the "Add Person" or "Edit Person" panel, scroll to the Skills section and click the "Manage Skills" button.
- The "Manage Worker Skills" dialog will open, displaying all available skills.
- Click "Add new" to create a new skill.
- Use the edit (pencil) icon to rename an existing skill, or the delete (trash) icon to remove one.
- Click "Close" when done.
Editing Users
- Click the three-dot menu (⋮) on a person's row and select "Edit". This menu also includes "Copy ID" to copy the person's unique identifier to your clipboard.
- The "Edit Person" panel will open on the right, where you can update their name, ID, team, shift, optional assignment, and skills.
- Click "Save" to apply changes.
Archiving Users
- To archive an individual user, click the three-dot menu (⋮) on their row and select "Archive".
- To view archived users, click the "Filters" button, then toggle the "Archived" switch to on.
- Note: Archived users can be retrieved at any time using the Archived filter.
Downloading Your People List
- Click the three-dot menu (⋮) in the top right corner of the page.
- Choose "Download as .csv" or "Download as .xlsx" to export your people list.
- Optional: Update multiple records in the downloaded file and re-upload using the "Upload people" option.
Filtering and Searching
- Use the Search bar to quickly find people by name.
- Click the "Filters" button to filter the list by ID, Team, Shift, Skill, or Archived status.
- Click "Reset" to clear all filters.
Printing QR Codes
- Select one or more people using the checkboxes on the left side of each row.
- Click the "Print QR codes" button that appears in the top toolbar.
Tips
- Use upload and download to keep your list of people up-to-date.
- Skills can be used as a workforce development tool, allowing you to track professional development of folks on your shop team.
- Use Filters to quickly find people by team, shift, or skill level.
Conclusion
Keep your people list current and the rest of the shop lines up behind it. You can add people one at a time, upload a list, download it again, and archive anyone who leaves.
Video walkthrough
People
Teams
Still need help? Ask the team