Forms
Build inspection templates, version them, and attach them to routes as planned or ad hoc forms.
Last updated 24 days ago
Introduction
Building Swell's Forms allows you to manage inspection documentation and processes across your projects. Planned or ad hoc, inspection forms are built from templates, attached to orders, and filled out during the inspection, so every check is recorded the same way.
You will meet the key concepts behind Forms, set up and manage templates, and fill Forms out from each place they appear.
General Concepts
Templates
Templates are the foundation of all inspection forms. A template defines the set of questions and input types that inspectors will fill out. Templates are created and managed under Forms → Templates.
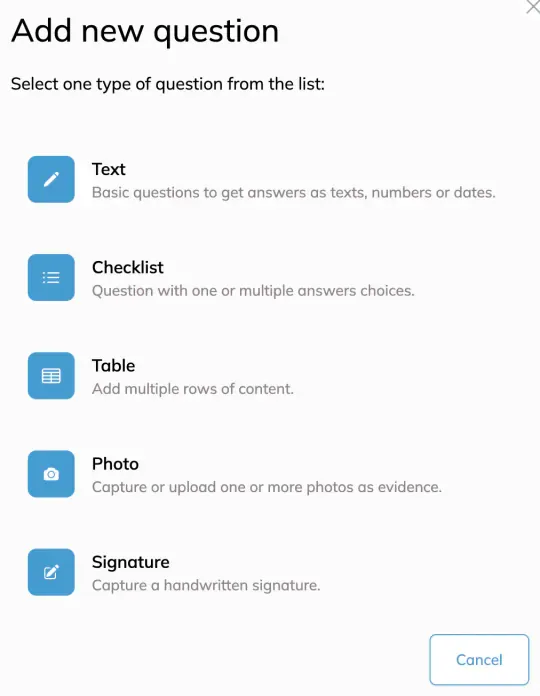
Each template can contain three types of form elements:
- Text: Basic questions that accept answers as text, numbers, or dates.
- Checklist: Questions with one or multiple answer choices.
- Table: Add multiple rows of structured content.
Once a template is ready, it must be sent live before it can be used in routes or ad hoc forms. Templates support versioning, so you can update questions over time without affecting previously completed inspections.
Planned Forms
Planned forms are inspection forms that are built into a Route. When you add a Forms template to a stage within a route, every order using that route will automatically include the inspection Form step at the appropriate point in the workflow.
The shop team will encounter the inspection step during the building process and be prompted to complete the form before moving forward (or they can skip it).
Ad Hoc Forms
Ad hoc forms are inspection forms that are started manually, outside of a route's predefined steps. They still draw from existing templates but can be created on the fly from several access points:
- Forms → Entries: Click the "Start Form +" button to begin a new inspection from the entries list.
- Planning View: Use the three-dot menu on an order and select "Start form."
- Order Details: Use the "More" menu or the "Start form" option to launch an ad hoc inspection tied to that order.
Ad hoc forms are useful for unplanned inspections, spot checks, or any situation where a inspection form is needed outside the normal route flow.
Step-by-Step Guide
Creating a Template
- Navigate to Forms → Templates from the left-hand menu.
- Click the "Add" button to create a new template.
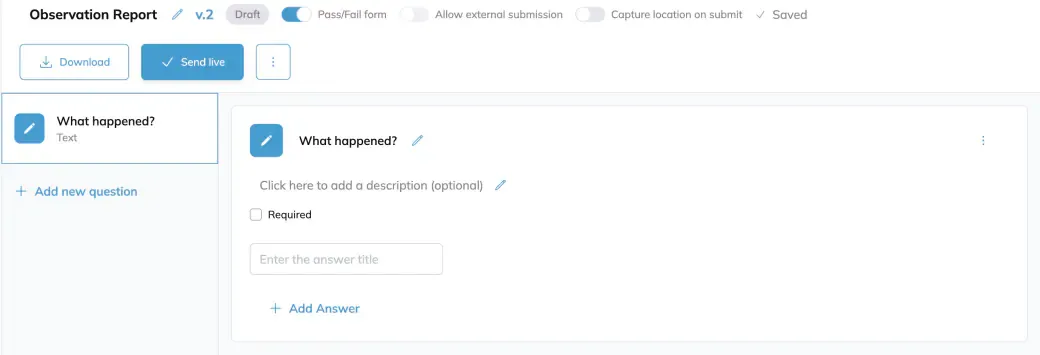
- Add questions using the "+ Add new question" button. Choose from Text, Checklist, or Table input types.
- Configure each question as needed.
- When your template is ready, click "Send live" to make it available for use.
Versioning a Template
- Open the live template you want to update from Forms → Templates.
- Click the "Create new version" button. This creates a new draft version while the current live version remains active.
- Make your changes to the draft version (add, edit, or remove questions).
- When ready, click "Send live" to publish the updated version. The previous version's completed inspections remain unchanged.
Adding a Template to a Route
- Navigate to Rules Engine → Routes.
- Find the Route you want to add the form template to. If the Route is already live, create a new version.
- Open the Stage where you want to add the inspection step.
- Click "+ Add QC step" at the bottom of the steps list.
- Select the form template you want to assign to that stage.
- Adjust the sequence by dragging and dropping. You can add more than one form template in a Route to customize the configuration to match your inspection process.
Starting an Ad Hoc Form
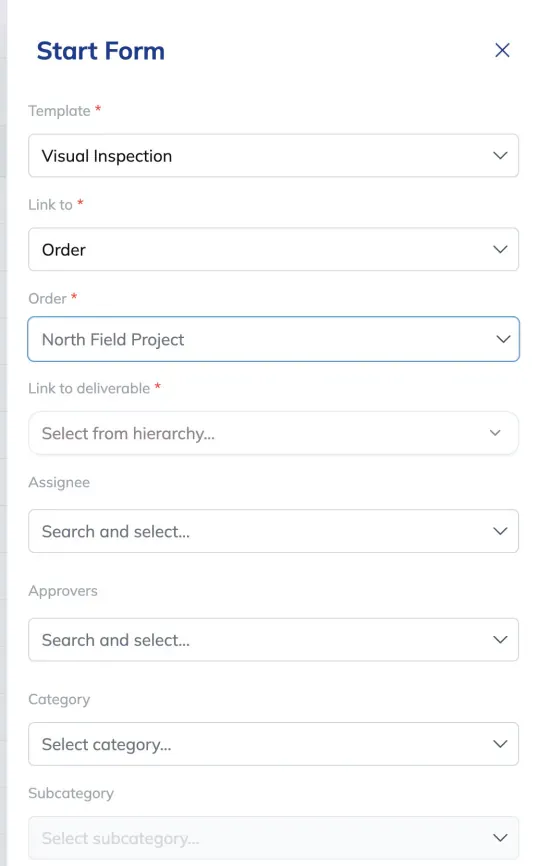
- Go to one of the ad hoc access points: Forms → Entries (click "Start Form +"), Planning view (three-dot menu → "Start form"), or Order Details ("More" menu → "Start form").
- Select the Template you want to use from the dropdown.
- Link the form to an order (required).
- Optionally assign an Assignee, Approvers, Category, and Subcategory.
- Click "Start" to begin the inspection.
Accessing Forms
Completed and in-progress inspection forms can be accessed from multiple locations:
- Forms → Entries: The central list of all form entries across all orders. Use filters to narrow by status, assignee, category, and more. You can also export entries from here.
- Order Details → Quality Control tab: Shows all forms tied to a specific order.
- Planning → Update Progress side tray: Click "View details" on a unit to see associated forms.
- Build View: QC steps appear inline with route stages. Click on a QC step to view or start an inspection.

Filling Out an Inspection Form
- Open the form from any of the access points listed above.
- Fill in the Title/Reason field if applicable.
- Answer each question in the form. For each question, you have the option to attach documents or photos using the "Attach document" button.
- At the bottom of the form, select "Pass" or "Fail" to record the inspection result.
- Add any comments in the Comments field if needed.
- Click "Finish inspection" to complete and save the form.

Pass/Fail and Questions-Only Forms
Every template is one of two kinds, set by the Pass/Fail form switch on the template.
-
Pass/Fail form. Adds an Overall check at the end. Somebody has to mark the form passed or failed, and that verdict is the form's outcome.
-
Questions-only form. No Overall check. A finished form records what was observed without passing or failing it. Good for observation reports, site conditions, and counts.
Which Kind to Use
- A form on a route step has to be Pass/Fail. When you add a form template to a stage, only Pass/Fail templates are offered, because a questions-only form has no Overall check and so cannot act as a gate.
- Only questions-only forms can be sent to someone outside your team on a public link.
- Everything else is a judgement call. If all you want is the record, use questions-only.
The two settings cannot both be on. Turning on Pass/Fail form turns Allow external submission off with it, and while Pass/Fail is on the external submission switch stays greyed out.
Changing the Kind Later
These switches are editable on a draft version only. On a published version they are locked, so create a new version to change the kind. Forms already created keep the kind of the version they were made from.
Sending a Form to Someone Outside Building Swell
Some forms need filling in by people who do not have a Building Swell login: a subcontractor confirming what they installed, a supplier checking a shipment, an inspector on site. A public link lets one person fill in one form in a browser without signing in.
Setting It Up
-
Open the template on a draft version. Turn Pass/Fail form off if it is on, then turn on Allow external submission.
-
Go to Forms → Entries and find the form you want filled in.
-
Open the row menu and choose Copy public link, then send the link on. The action only appears on forms that are eligible for one.
What the Other Person Sees
They get the form's name and its questions, and nothing else from your shop. They answer, attach photos or a signature if the form asks for them, and submit.
Required questions are enforced on their side too. Submitting with one still blank returns Please answer all required questions before submitting.
Once it is in, the entry reads Recorded and is attributed to Public link rather than to one of your people.
Rules Worth Knowing
-
A link works once. Submitting spends it. If the same form needs filling again, copy a fresh link. A submission that gets rejected, such as one with a required answer missing, does not spend the link, so they can correct it and try again.
-
Links expire. Each one carries its own expiry. Copy a new one if somebody comes back later.
-
One form per link. A form entry covering several inspections cannot go out this way.
-
Turning the setting off withdraws links you have already sent. Eligibility is checked when the link is opened, not only when it was copied. Turn Allow external submission off, or switch the template back to Pass/Fail, and links already in circulation stop working.
-
Every dead link gives the same message. Whoever opens it sees "This link is invalid, expired, or no longer available." It deliberately does not say which, so nobody outside your team learns anything from it.
-
Location can be recorded on submit. With Capture location on submit turned on, the browser is asked for location as the form is submitted, the same as an in-app submission. Captures land in Forms → Geolocation.
Delivery Confirmation Forms
Deliveries use these same templates. Setting up an outbound delivery lets you pick a confirmation form for the receiving side, and that picker lists only questions-only templates with Allow external submission turned on. If it tells you no forms are available, that is the setting to check.
FAQ
-
How do I edit a live form template?
You must create a new version of the template using the "Create new version" button on the template detail page. Edit the draft, then send it live when ready.
-
Can I add the same template to a Route more than once?
Yes. You can add the same form template to different stages of the Route. However, you cannot add the same template more than once within a single stage.
-
Is the Form inspection step required for orders on a Route with a QC step?
No. You can skip the inspection by selecting the "Skip for now" button at the bottom of the inspection form. The shop team can continue making progress.
-
Can I control who accesses the form template page or fills out QC forms?
Yes. Reach out to your account representative to set custom permissions for form access.
-
What is the difference between a planned form and an ad hoc form?
A planned form is automatically created as part of a Route's form step. An ad hoc form is started manually from Forms → Entries, Planning view, or Order Details when an inspection is needed outside the normal route flow.
Conclusion
Forms handle inspections two ways: planned steps on a route, and ad hoc forms you start when you need one. Templates, versioning, and several access points mean the form shows up where the work happens.
Have additional questions? Contact Us
Still need help? Ask the team